Earlier I shared how to register a U.S. company for $150 in 7 days. If you have already taken the first step and successfully registered a U.S. company, then congratulations, you have obtained the admission ticket to the world of Stripe. As a top-tier cross-border payment tool, Stripe, with its stability, efficiency and broad compatibility, is becoming the first choice for an increasing number of cross-border sellers and independent developers.
The table below will clearly tell you why it is better to apply for Stripe with a U.S. company
| Comparison dimension | U.S. company (LLC) | Hong Kong company | Personal account |
|---|---|---|---|
| Account stability | Highest. As a Stripe local entity, risk control is the most lenient and freezes are extremely rare. | Medium. Risk control is stricter, and you may face more frequent reviews and delayed fund settlements. | Lowest. Functionality is limited, large or high-frequency transactions easily trigger risk control, and the account is very prone to being frozen. |
| Feature completeness | Most comprehensive. Supports all mainstream payment methods, and you can use all advanced features such as subscriptions and invoices. | Basically sufficient. Supports most mainstream features, but some advanced services targeting the U.S. domestic market may be unavailable. | Limited. Some advanced features may be missing or require a separate application, and the available payment methods are relatively few. |
| Fee advantage | Best. Enjoy U.S. domestic preferential rates; for example, the U.S. domestic credit card transaction rate is 2.9% + $0.30. | Medium. Cards issued locally in Hong Kong: 3.4% + HK$2.35. Non-Hong-Kong issued cards: 3.9% + HK$2.35. | Disadvantaged. The rates are usually the highest and there is no clear rate policy; you may be charged higher fees depending on business type or region, and exchange rate losses are also higher. |
| Applicable businesses | All legal businesses. Best suited for e-commerce, SaaS, AI tools, digital products, subscription services, etc. | General trade/e-commerce. Suitable for regular online sales, with stricter scrutiny for high-risk businesses. | Simple businesses. Only suitable for small, temporary collections, not for long-term, large-scale commercial operations. |
Below we will start introducing how to apply for a Stripe business account with a U.S. company as the entity. Before applying, you need to prepare the following key materials in advance:
- U.S. company information: including your company name and address
- U.S. company EIN tax number
- U.S. bank account: We recommend using Mercury bank, which is designed specifically for startups and cross-border e-commerce. The account opening process is simple and there are no significant maintenance fees afterward
- U.S. phone number: used to receive verification codes and important notifications; Google Voice will do
- U.S. company business/store website: a website or store link that showcases your U.S. company's business. Even just a simple Notion page or Shopify store draft can be used to pass the review; if you don't have one, just let AI generate one for you.
OK, once the materials are ready, you can start registering. The entire registration process only takes a few minutes and has no technical difficulty at all. Just follow the steps below one by one:
Step 1: Create a Stripe account
- Visit the Stripe official website: stripe.com or directly visit the registration page https://dashboard.stripe.com/register
- Click the “Sign in” entry in the top right corner.
- Enter your email and password to complete the basic account registration. To avoid not receiving the verification email, we recommend using Gmail or Outlook.


Step 2: Choose the account type
After creating the account above, you will enter the page below. For all the pop-up dialogs, just choose to skip for now in the bottom left corner

For the last pop-up, choose to go to the real account, then it will prompt you to verify your email; just complete the email verification

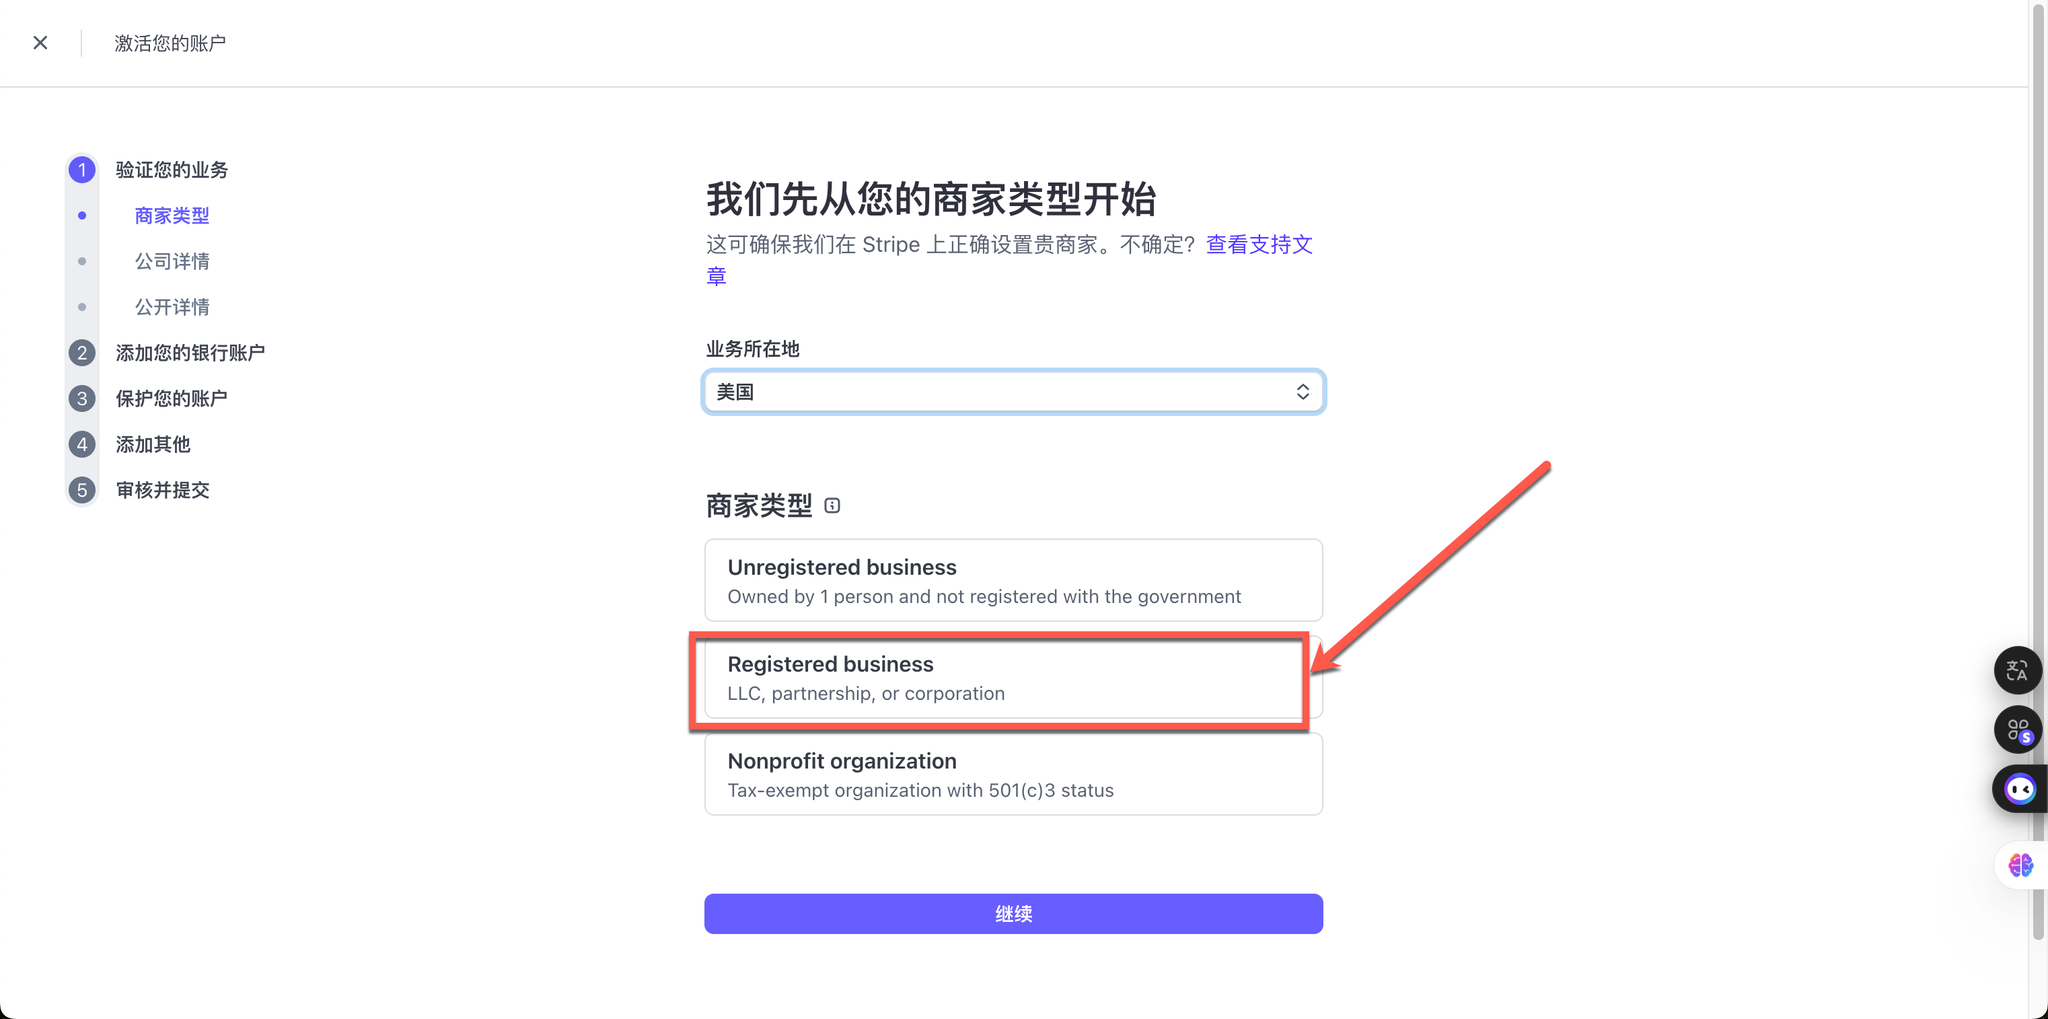
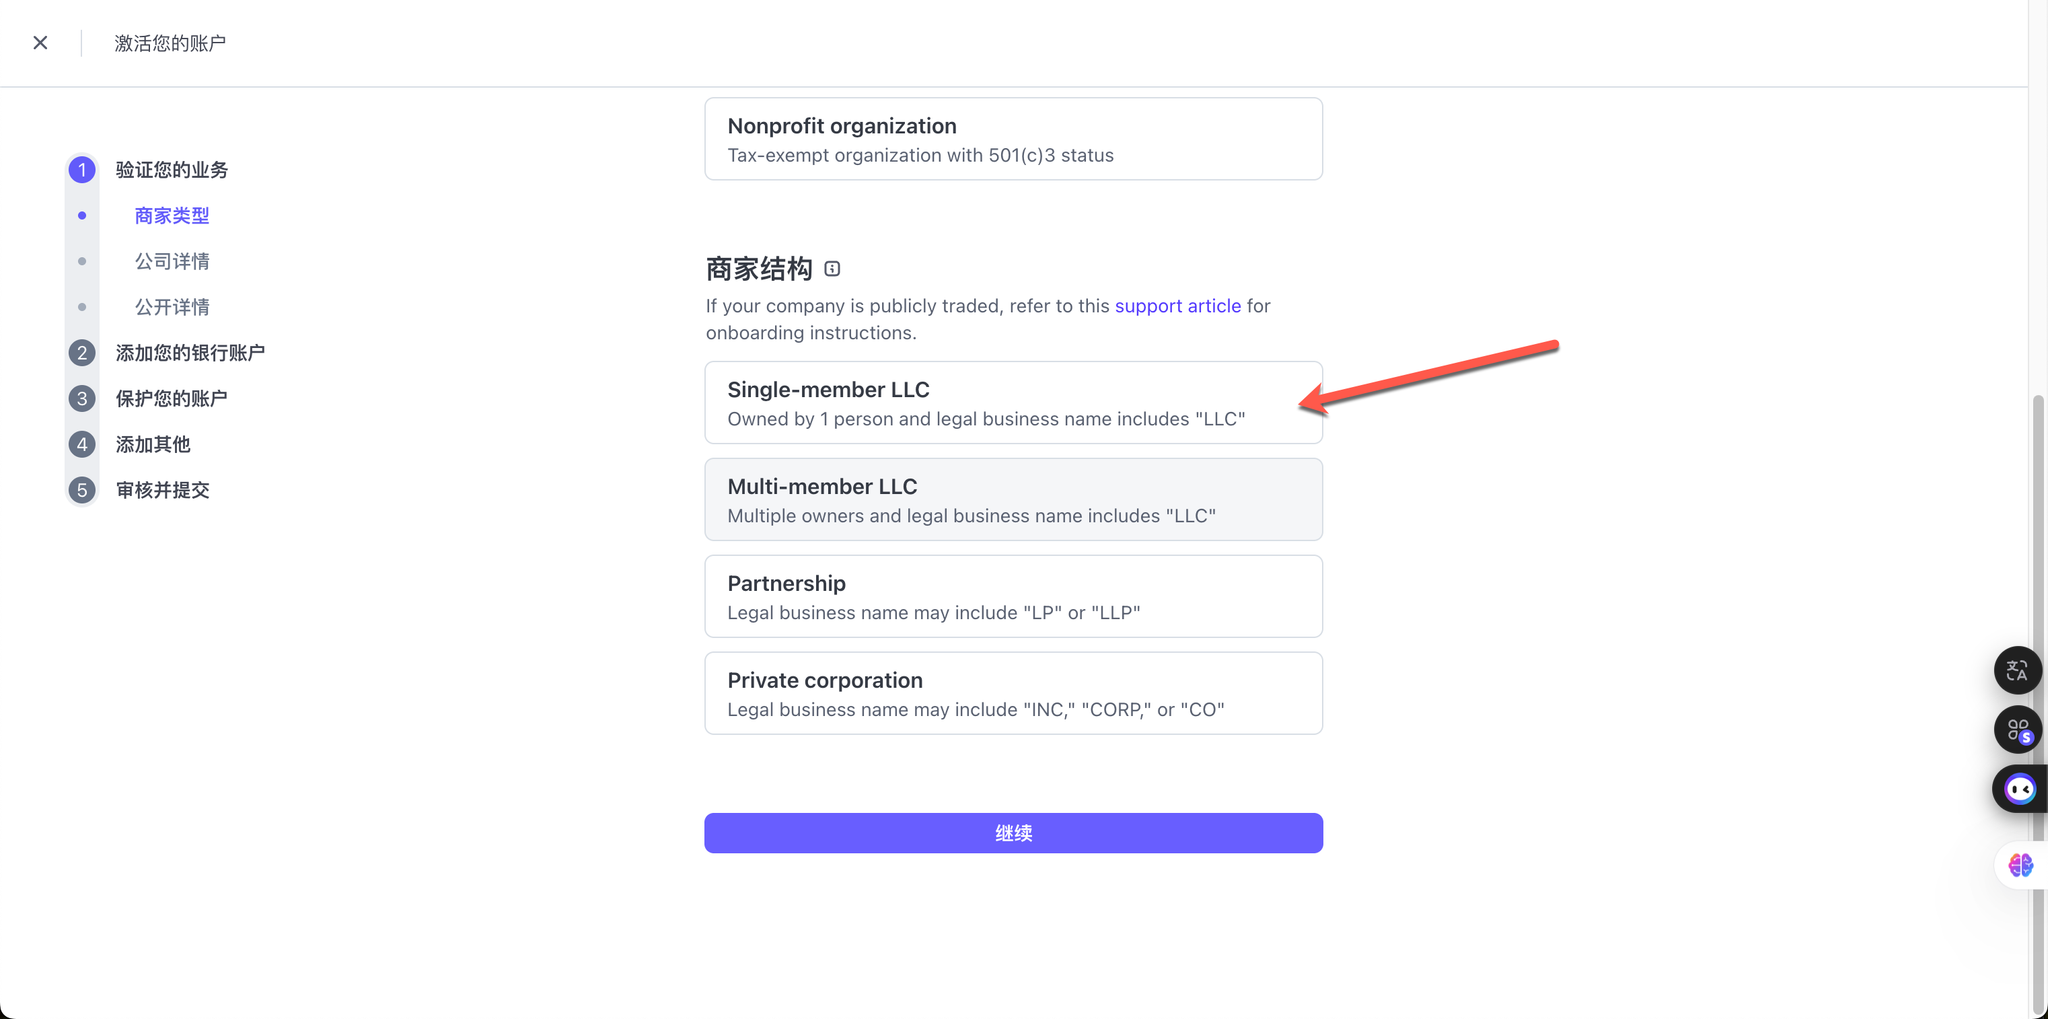
- Then you arrive at the account type selection page, which is the most critical step. Please be sure to select “I am a business (LLC company)”, rather than a personal account. This is the dividing line that distinguishes personal and business accounts; business accounts are more powerful and also more stable.
Step 3: Fill in the company and legal representative information
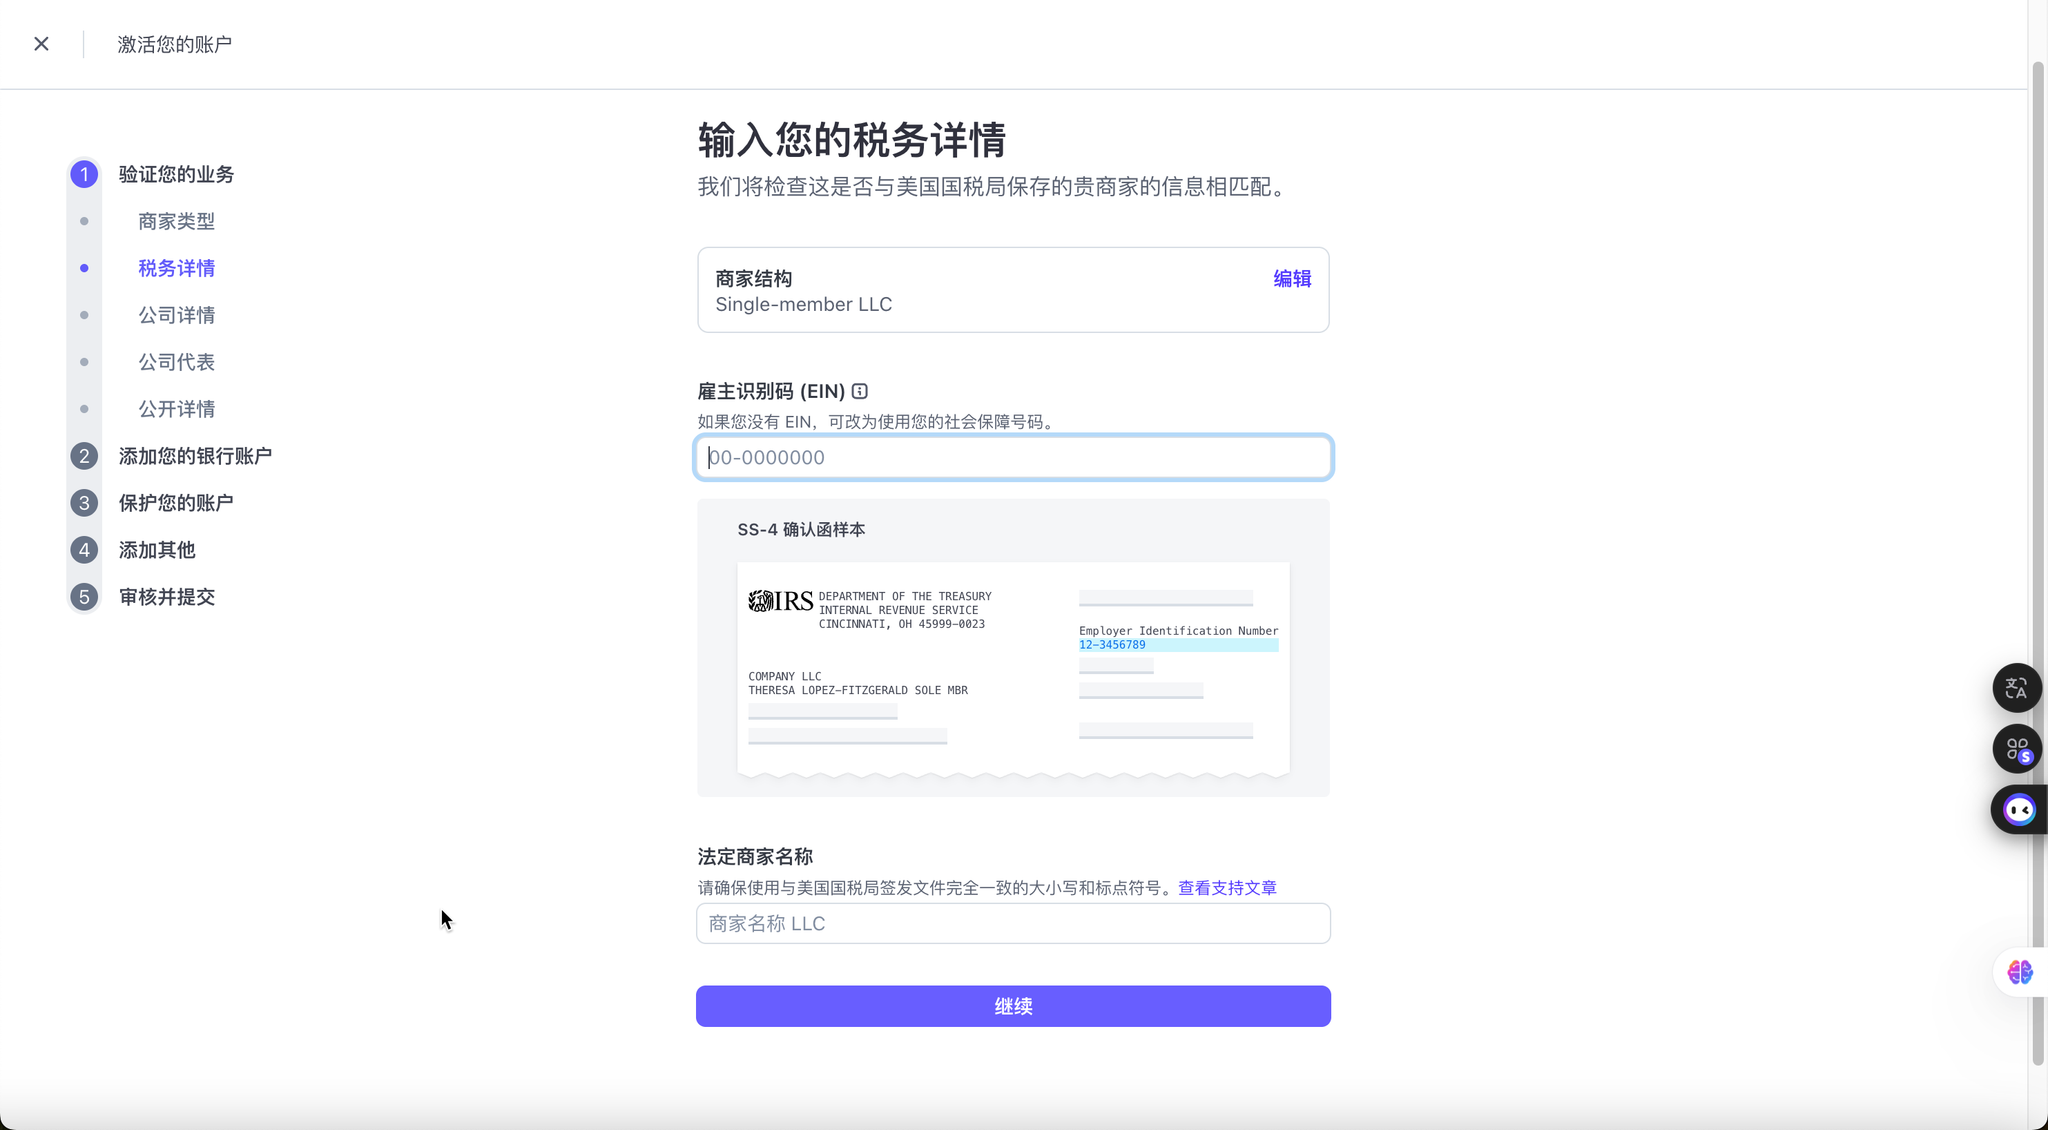
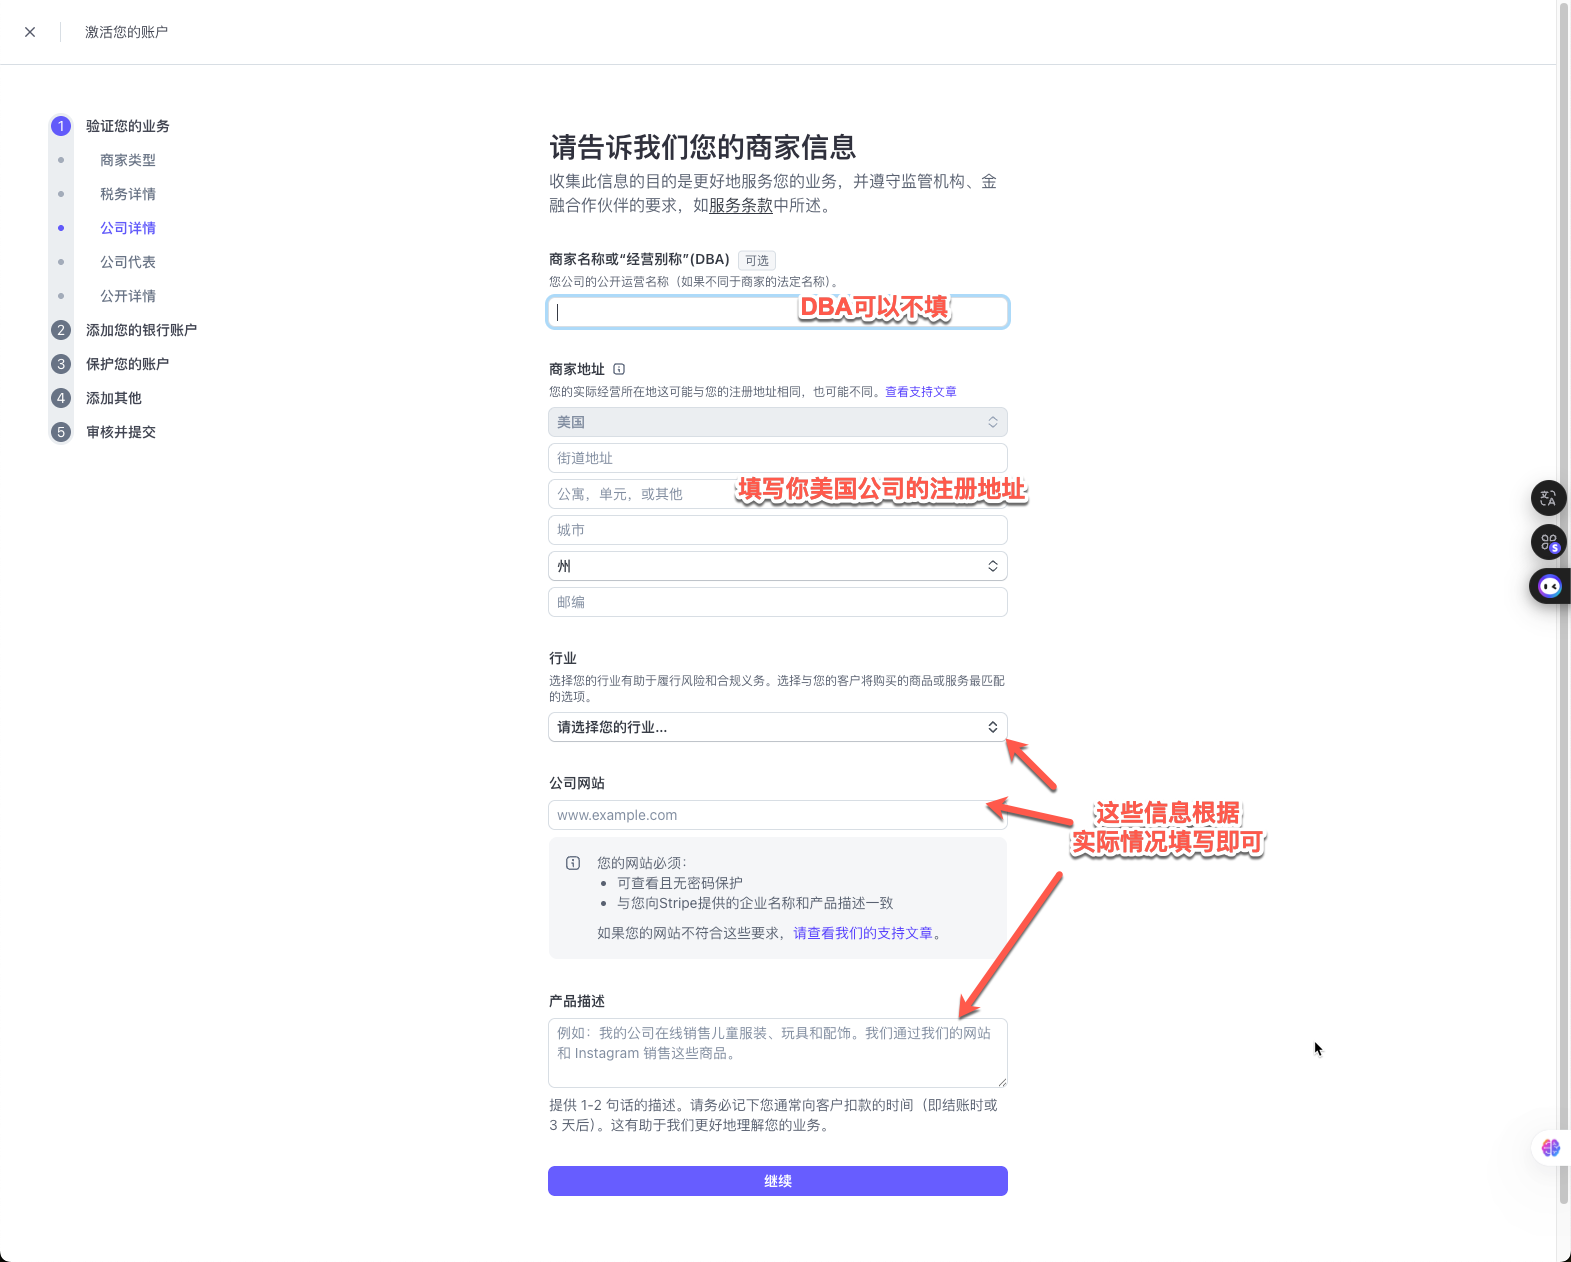
- Company information: Truthfully fill in the U.S. company name, address and EIN tax number you have prepared.
- Legal representative information: Fill in your own real information, including name and date of birth. Even if you are not in the U.S., please rest assured to fill in your home address in China.
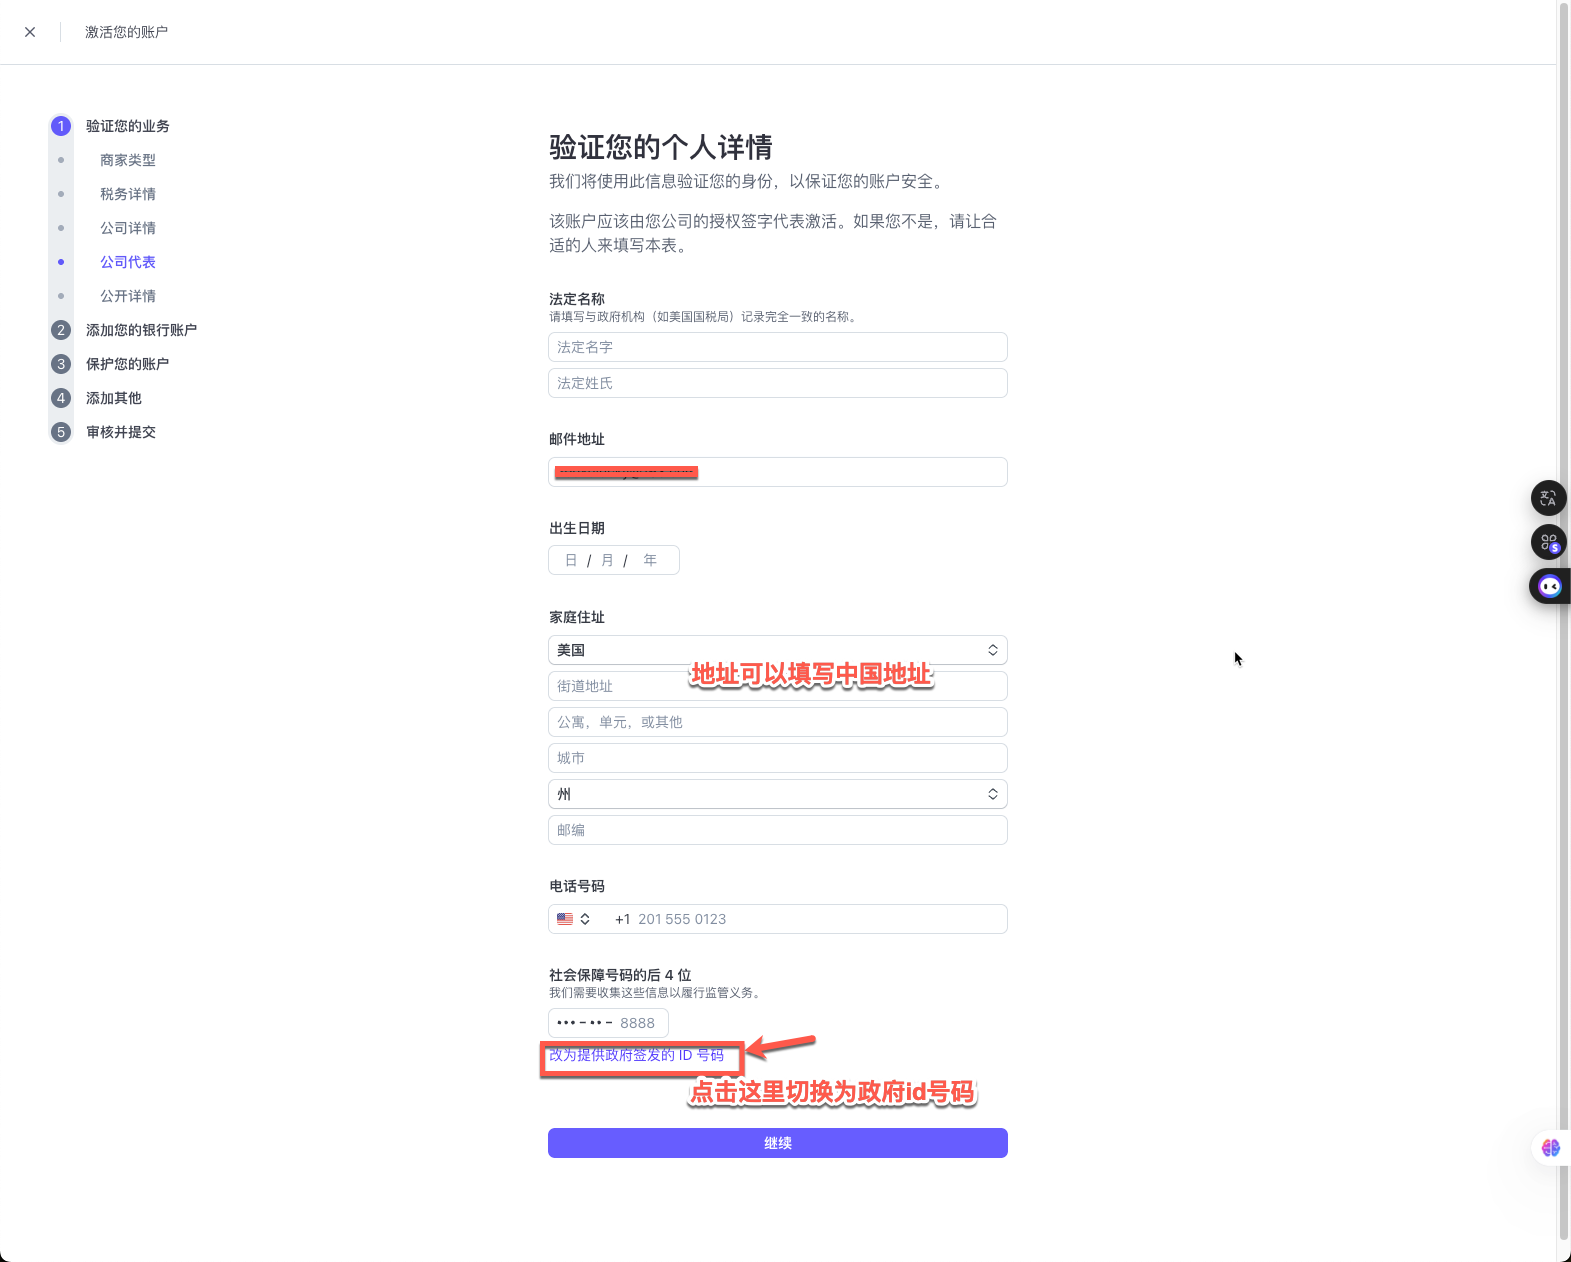
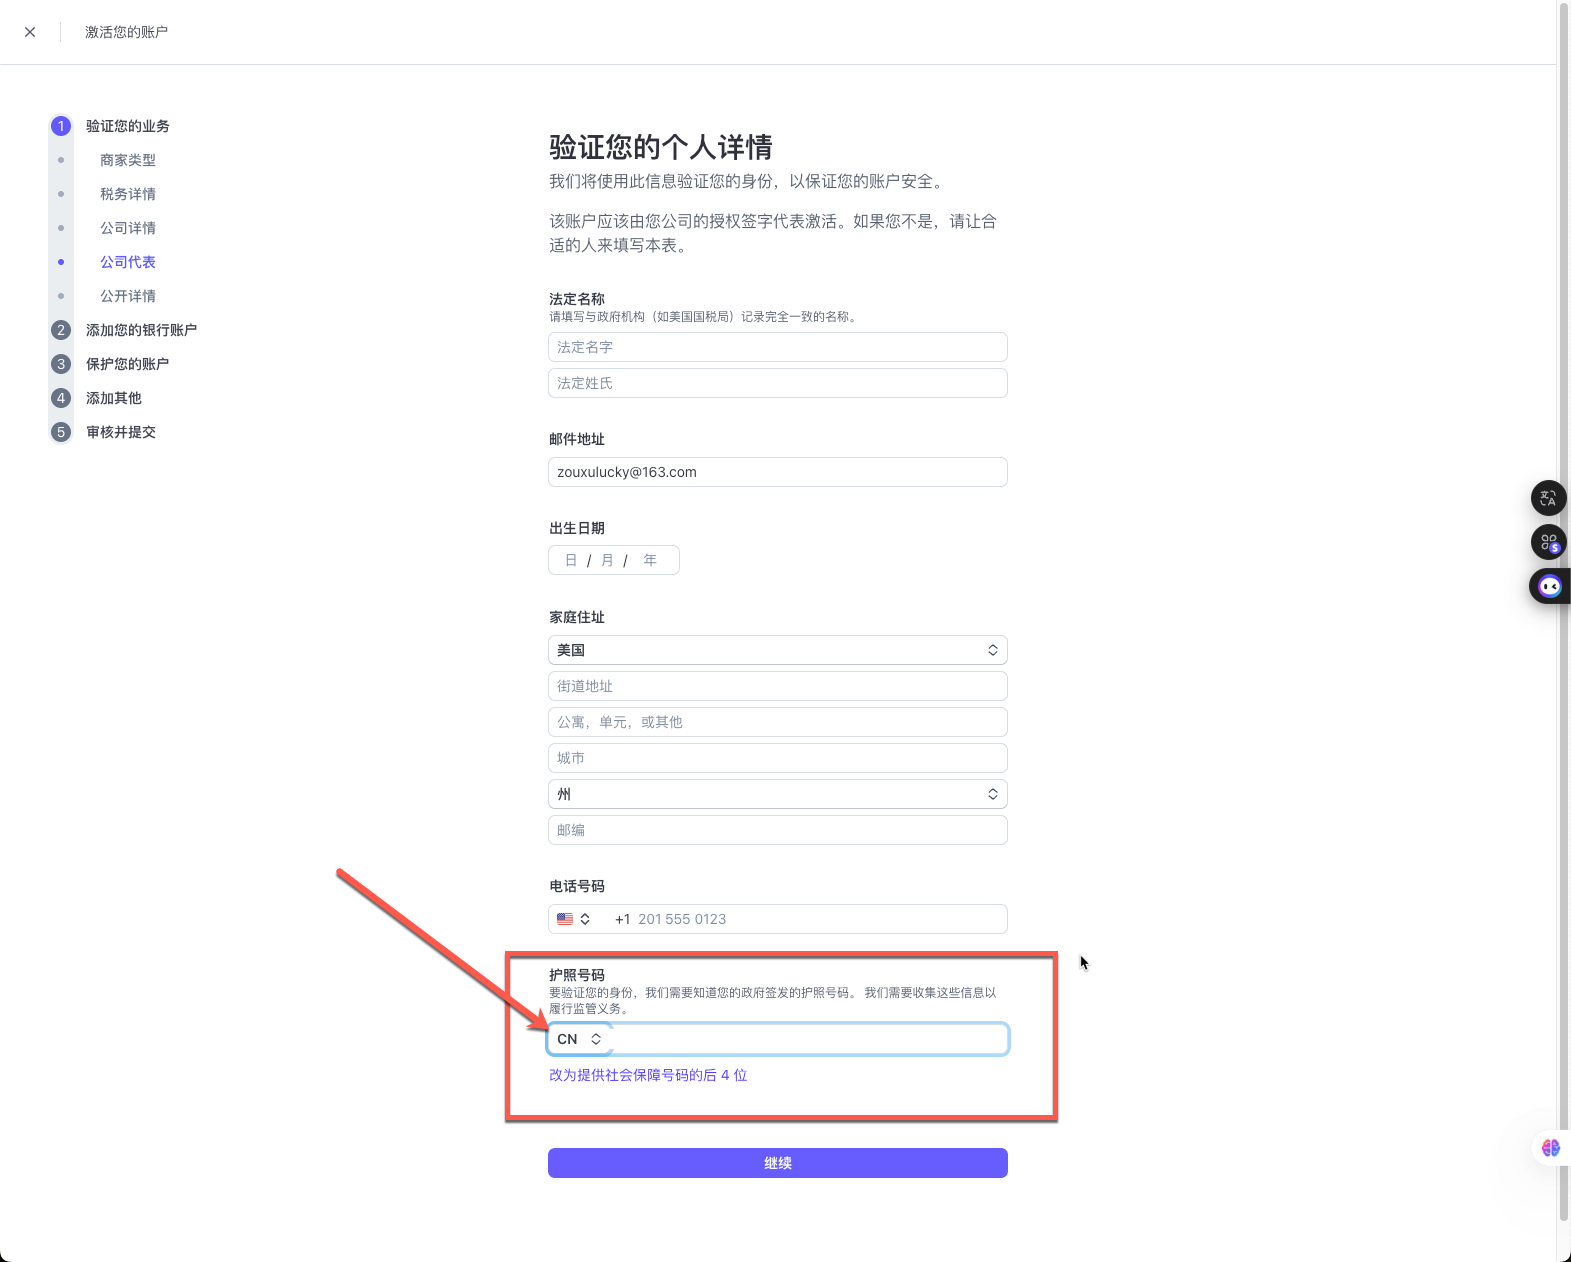
Finally, for the last 4 digits of the Social Security number, click the option below to switch to a government ID number, and then you can fill in your passport information
Step 4: Link a payout bank account
- Enter your U.S. bank account information (account number, routing number) into the Stripe dashboard. Stripe will settle your collected payments to you through this account.
Step 5: Provide business and website information
- Website link: Enter your company website or store link. If you don't have a formal website yet, a Notion page containing product descriptions can also be used for the review.
- Business description: Summarize your business in simple and clear words, for example “We sell consumer goods to U.S. customers through an online store”. Avoiding sensitive terms such as virtual currency and financial services can greatly improve the approval rate.
Step 6: Submit for review, and wait for approval!
- After submitting all the information, Stripe will immediately start the review. Usually, the review is very fast, and most people receive the approval email within an hour.
After successful registration, you can log in to the Stripe dashboard and start generating payment links, or integrate Stripe into your website.