
Creem is an overseas payment platform built for software products and indie developers. You can use it to create digital products, generate payment links, handle checkout, manage orders, and cash out your revenue by linking a payout account. For solo developers, it works well for selling SaaS, templates, toolkits, digital downloads, license keys, and similar products.
This article walks through the full path in Creem, from sign-up to linking a payout account, following the actual workflow. By the end, you'll have done three things:
- First, create a product in Test Mode and complete a test payment.
- Second, submit the business details and identity verification required before you can accept real payments.
- Third, add an Alipay payout account through Paysway and link it to the corresponding Store.
If this walkthrough helps, consider liking and bookmarking it so you can follow along step by step.
1. Sign Up / Log In to Creem
Open creem.io and use the sign-up or login entry point in the top-right corner of the homepage.
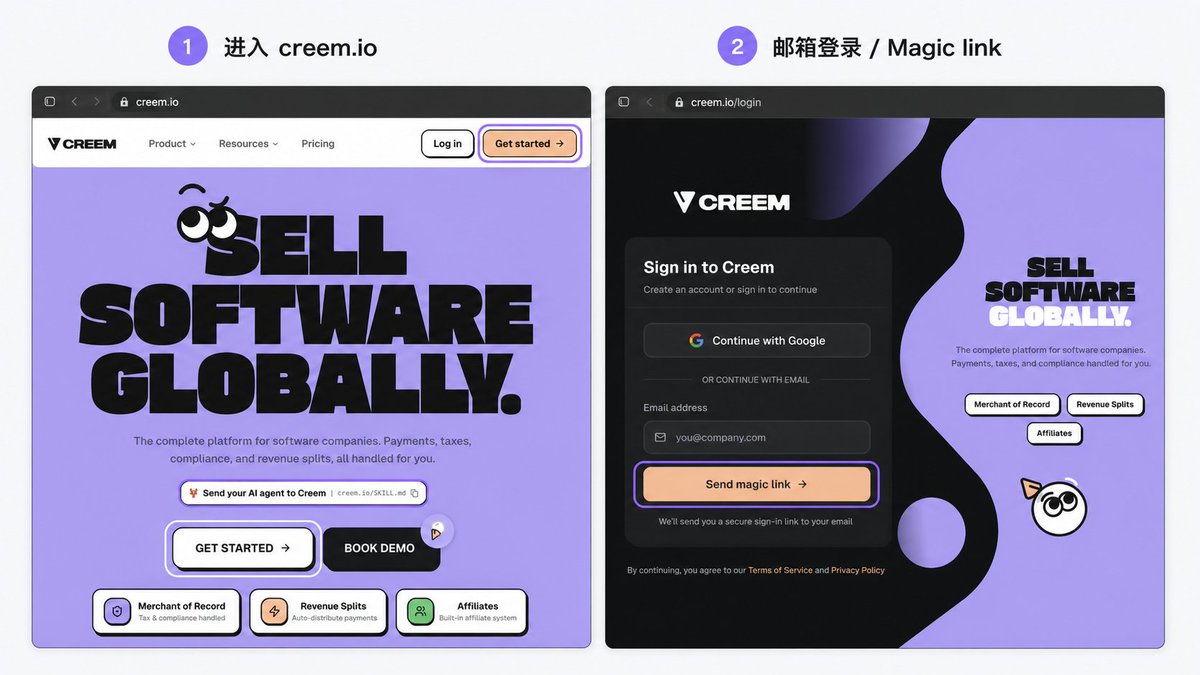
Creem homepage + login page
The Creem login page supports Google sign-in as well as email magic-link sign-in. With email sign-in, you don't need to set a password — just enter an email address you can receive mail at, then click the link in the email to log in.
2. Create a Store
After logging in, Creem first asks you to create a Store.

Create Store page
When creating a Store, you need to enter a Store name and confirm that the Store URL is available, and choose whether you're operating as an individual or a business. If the URL is already taken, the page will flag it directly and you'll need to change the name or URL. Solo developers can choose Individual; if you already have a registered company, choose Business instead.
3. Enter the Dashboard
Once the Store is created, you'll land in the Creem Dashboard.

Dashboard homepage
If Test Mode is shown at the bottom of the page, you're still in the test environment. In this mode you can create products, generate payment links, and simulate payments, but no real transactions occur.
4. Create Your First Product
Creem will guide you through creating your first product.

Four steps to create a product
Creating a product mainly involves four steps:
- Basic info: enter the product name and description.
- Set pricing: choose the billing type, currency, price, and tax category.
- Upload product images: you can skip this for now.
- Configure Features: set up delivery features like file downloads or license keys; if you're just testing the payment flow, you can leave this unconfigured for now.
5. Copy the Payment Link
Once the product is created, go back to the Products page to see the product list.

Product created + product list + Copy Payment Link
In the product list, open the action menu next to the product and choose Copy Payment Link. This link is the checkout page link for that product. If you're just testing the payment flow, you don't need to set up API integration first.
6. Complete a Test Mode Payment
Open the Payment Link you just copied to reach the Checkout page.

Test Mode payment page + successful payment + Paid record in the dashboard
If a Test Mode notice appears at the top of the payment page, this payment won't actually charge anything. Fill in the email, name, billing address, and a test payment method as prompted, then click pay; if everything works, you'll be taken to the payment success page.
7. Check Payments in the Dashboard
After completing the test payment, go back to the Creem Dashboard and open Payments on the left.
If the order you just placed shows up in the list with a Paid status, it means product creation, the payment link, and the test order flow in Test Mode are all working correctly.
8. Open Balance to Set Up Payouts
With the test flow done, it's time to set up real payments. Go to Balance on the left, then switch to the Payout Account section.

Balance page
If you don't have a payout account yet, the page will show No Payout Account and prompt you to set one up. On the right, it lists what you need to complete before payments can be enabled:
- Submit your product and business details
- Complete KYC or KYB verification
- Add a payout account
- Wait for Creem's review
Clicking Set Up Payout Account takes you into the submission flow.
9. Fill in Business Details
Business Details isn't just about company information — it first confirms your business type, tax residence, product status, and compliance situation.

Business Details flow
This section confirms, in order:
- Whether you operate as an individual or a business
- Your country of tax residence
- Whether the product is ready to accept real payments
- Product or brand name
- Contact email
- Information about you or your business
- Product and platform details
- Product compliance and transparency
- Whether you already have paying customers
- Whether your website shows user counts or reviews
- Whether the product is an AI wrapper
Fill in your current real situation as you go. Choose your business type based on your actual current status, not future plans; enter your actual current country of tax residence; the product readiness check looks at whether the product can already be shown publicly, and whether the privacy policy, terms of service, and product description are accessible.
Contact Email must be an address on your own domain — personal or temporary email addresses generally won't be accepted.
10. Submit Identity Verification
After submitting Business Details, you'll be taken to Sumsub's identity verification flow.

Sumsub verification entry + verification steps
Sumsub will ask you to complete a few steps: personal information, ID document, liveness check, and a questionnaire. Once you reach the verification page, confirm it's Creem's verification flow, then follow the prompts to begin.
If asked to upload an ID document, choose the document type and upload both the front and back images. When uploading, the page will show the supported file formats and size limits.
11. Handle Camera Permissions and the PEP Questionnaire
During identity verification you may be asked to turn on your camera for a liveness check.

Camera permission prompt + liveness check / PEP questionnaire
If your browser hasn't enabled camera access, Sumsub's page will prompt you to enable the camera in the site permissions settings to the left of the address bar.
After the liveness check, you'll also be asked PEP-related questions — that is, whether you're a politically exposed person, or closely associated with one. Answer truthfully and continue submitting.
Once everything is complete, the page will show your details as verified, and you can return to the Creem Dashboard.
12. Add a Payout Account
Once identity verification is complete, continue setting up your payout account.

All payout accounts page + add account entry
On the All payout accounts page, you can choose Bank accounts or Crypto wallets. This walkthrough uses a bank / local payout account, so choose Bank accounts, then click to add a bank account.
13. Set Up a Payout Method
Clicking to add an account takes you to Paysway's payout account setup page.

Paysway add payout account flow
The Paysway page asks you to choose a payout country, currency, and transfer method. This walkthrough uses the following:
| Setting | Choice |
|---|---|
| Payout country | China |
| Currency | CNY |
| Transfer method | Alipay |
On the account information page, enter the corresponding Alipay payout details, including the Alipay account and the account holder's name. Once submitted, the Paysway page will show the payout account you just added.
14. Link the Payout Account to a Store
Once the payout account is created, go back to Creem's payout account page.

Payout account Pending + Link to store
The newly added account will appear in the list, initially showing a Pending status. Once the account is approved, the status changes to Approved. At that point, click Link to store, choose the Store you created earlier in the popup, and confirm the link.
Once linked, the Linked stores count on the account card will show how many Stores are linked. At this point, the payout account is linked to your current Store.
15. Wait for Review
Once Business Details, identity verification, and payout account linking are all done, everything needed to enable payments has been submitted. Before approval, the Payout Account or related status may continue showing Pending; once approved, payments and payouts can be fully enabled.
At this point, the full Creem walkthrough covers:
- Signing up
- Creating a Store
- Creating a product
- Completing a Test Mode payment
- Submitting business details
- Completing identity verification
- Adding a payout account
- Linking it to a Store
- Waiting for Creem's review to enable payments