
A static proxy keeps the same IP for as long as your plan lasts, but you usually get it as one line:
IP:port:username:password. How you use it depends on what should go through it: just Chrome, the whole computer, or a few specific apps. This guide covers each case, then gives one set of checks and fixes for all of them.
The guide has six parts: choosing a method, then the browser, the whole computer, single apps and the command line, and finally checks, fixes and notes.
1. Understand your details and pick a method
Static proxies are usually written as four colon-separated values: IP:port:username:password. Whichever method you use, each value goes into its own box.
| Field | Example (demo only) |
|---|---|
| IP | 203.0.113.25 |
| Port | 7069 |
| Username | your_username |
| Password | your_password |
The string does not reveal the protocol, which may be HTTP, HTTPS or SOCKS5. Follow your provider's page, and try HTTP first if it does not say. Use this table to pick a method:
| You want | Use | Proxy type |
|---|---|---|
| Only Chrome on the proxy | IP Proxy Assistant extension | HTTP / HTTPS with username and password |
| The whole computer's regular traffic | System proxy, or Proxifier with the default rule pointing to the proxy | HTTP; Proxifier also supports SOCKS |
| Only certain apps, everything else direct | Proxifier rules | HTTP(S), SOCKS |
| Command line and developer tools | Environment variables or each tool's own proxy option | HTTP, SOCKS5 |
Your username and password are the key to the proxy. Blur them in screenshots and never post the real IP, username and password in public.
2. Method one: Chrome only
This is the simplest option and leaves every other app alone. Chrome has no proxy settings page of its own and does not accept credentials in the address, so use the IP代理助手 (IP Proxy Assistant) extension. It supports HTTP, HTTPS, SOCKS4 and SOCKS5, but only HTTP supports username and password, and its settings stay on your own computer.
Step 1: Add the proxy in Chrome
Install the extension from the Chrome Web Store and pin it. Click its icon, then the settings icon at the top right of the popup to open the proxy manager. Click the add-proxy button and fill in:
- Name: anything, for example “Static proxy 1”.
- Protocol: choose HTTP. If a provider says its HTTP proxy “supports HTTPS sites”, still pick HTTP; choose HTTPS only when the proxy entry point itself uses TLS.
- IP and port: the first and second values.
- Username and password: the third and fourth values. The eye icon lets you check for stray spaces.
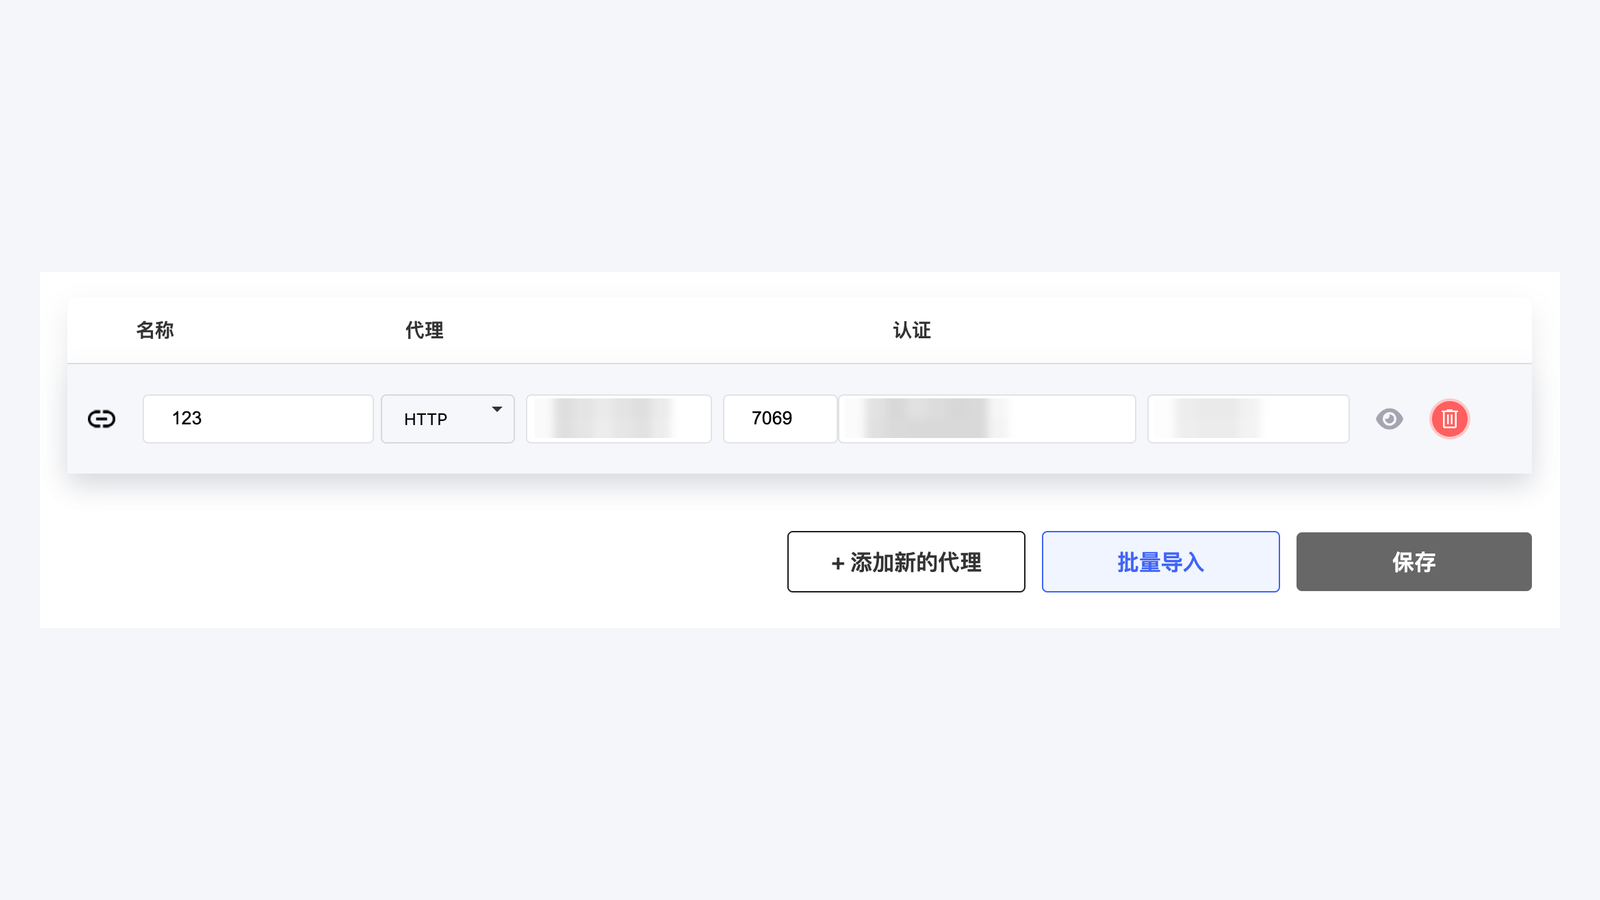
Image: One row holds the name, protocol, IP, port, username and password (details blurred).
Click Save at the bottom right. If you close the page without saving, nothing takes effect.
Step 2: Turn on the browser proxy
Click the extension icon and switch on your proxy in the list; the popup header shows the active proxy. When you are done, click the red Disconnect button and Chrome returns to its previous system proxy mode.
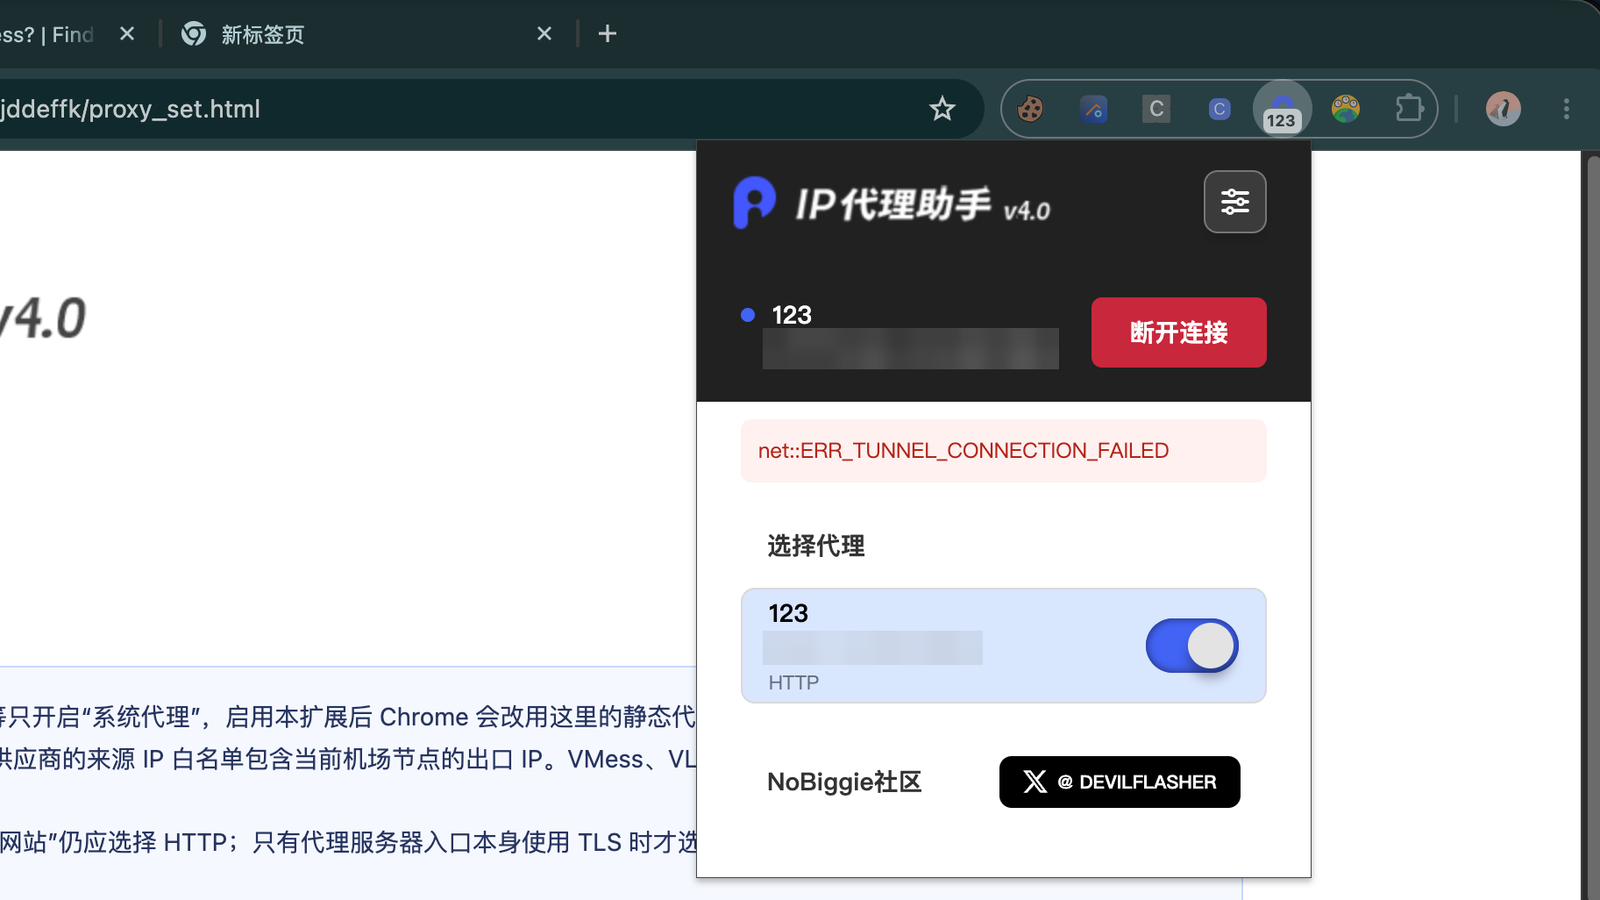
Image: Once the switch is on, Chrome uses this proxy right away.
While the extension is on, Chrome uses the extension's proxy rather than the system proxy from method two. SOCKS4 and SOCKS5 in this extension do not support username and password, so use Proxifier (method three) for SOCKS5 with credentials.
3. Method two: the whole computer (system proxy)
The system proxy is an operating-system setting that browsers and most apps that respect system settings will read.
Step 3: Set the system proxy
Windows 10 / 11
- Open Settings > Network & internet > Proxy.
- Next to Manual proxy setup, click Set up and turn on Use a proxy server.
- Enter the IP and port, then click Save.
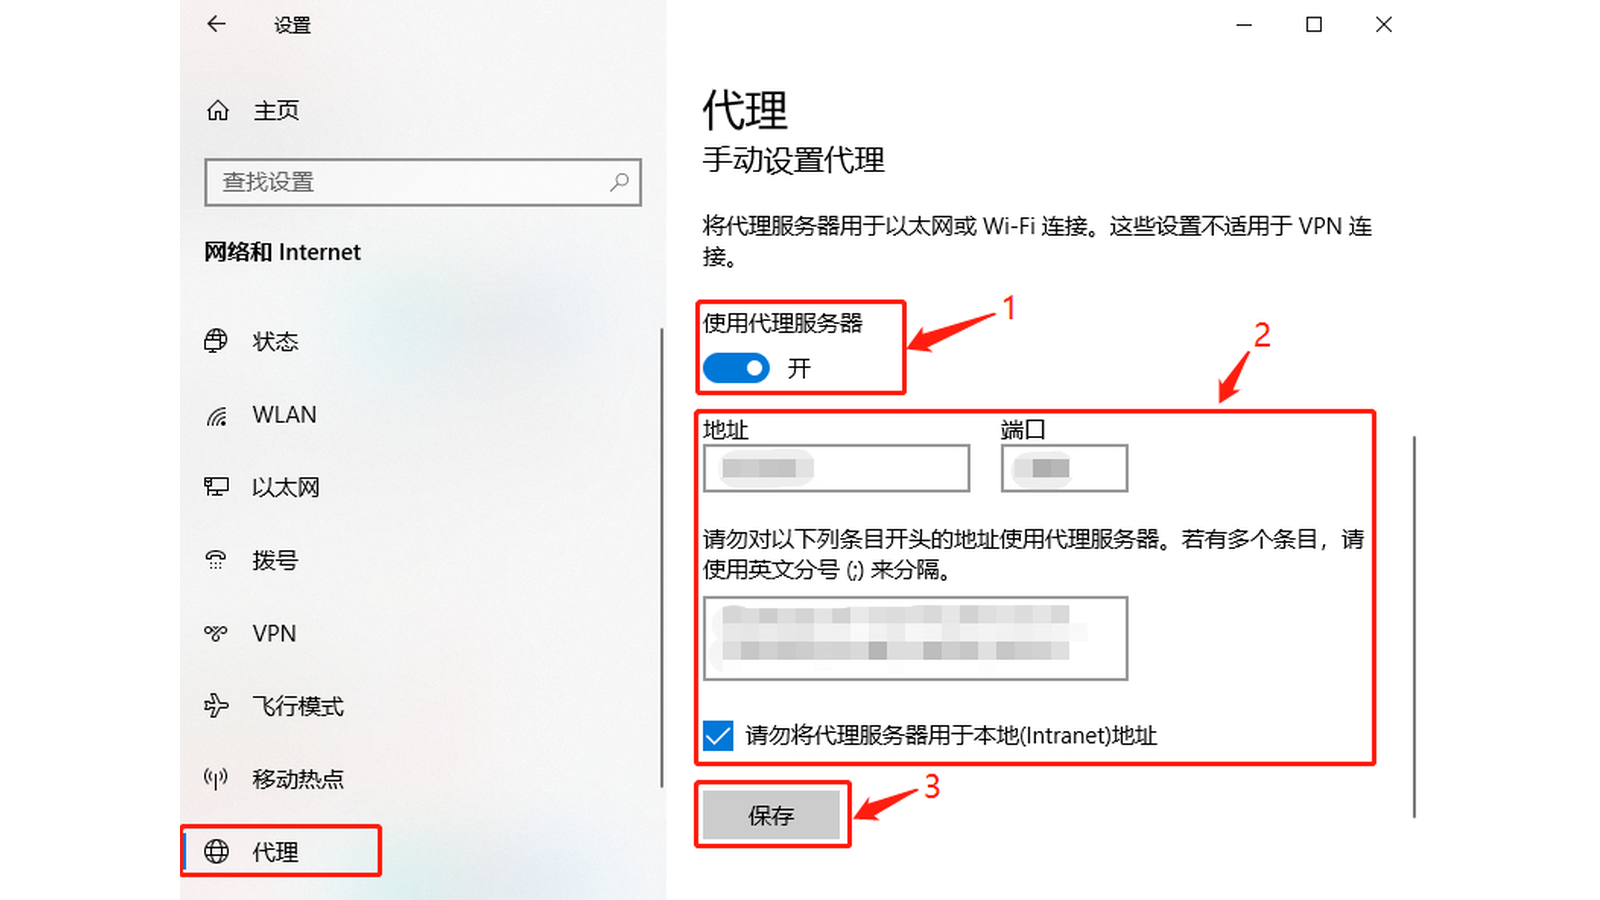
Image: The system proxy page in Windows.
This Windows page has no username or password boxes. The first time an app that respects the system proxy connects, such as a browser, it shows a sign-in prompt where you enter them.
macOS
- Open System Settings > Network, select your active Wi-Fi or Ethernet connection, click Details, then Proxies.
- For an HTTP proxy, turn on both Web Proxy (HTTP) and Secure Web Proxy (HTTPS) and enter the same IP and port in each.
- Tick “Proxy server requires password”, enter the username and password, and click OK.
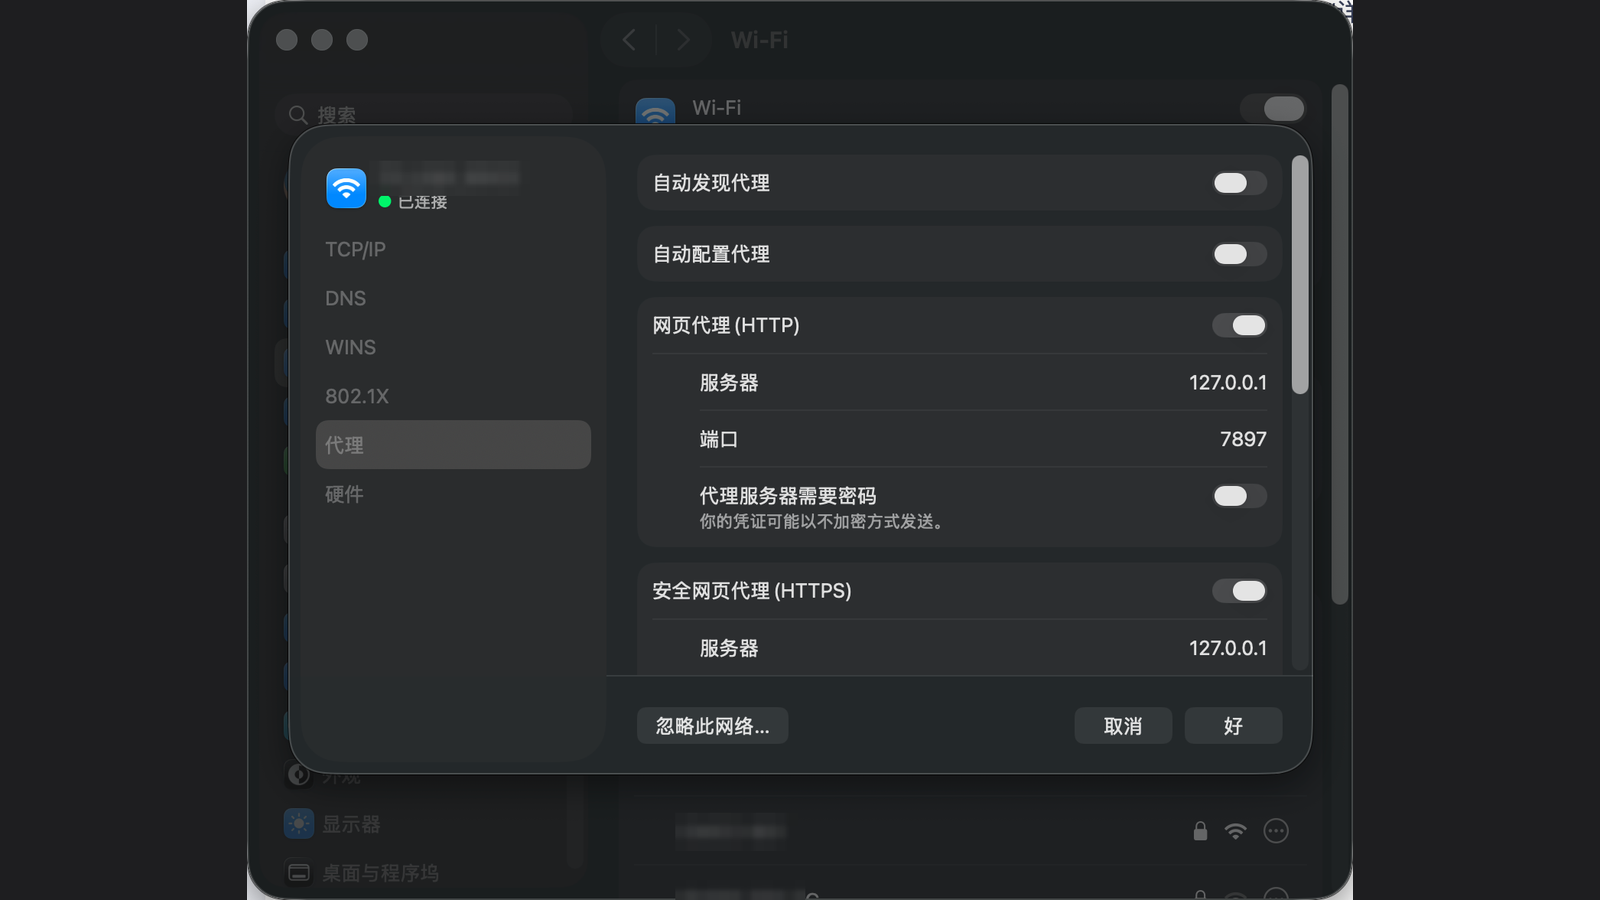
Image: macOS lets you enter the username and password right on the proxy page.
The system proxy only works for apps that choose to read it. Many clients, games, command-line tools and apps with their own network stack ignore it, and non-web traffic such as UDP is not forwarded. For those, use Proxifier below.
4. Method three: specific apps (Proxifier)
To send only certain apps through the proxy, or to cover apps that ignore the system setting, use the proxy forwarding tool Proxifier. Its website lists support for Windows and macOS and for per-app rules, and it offers a free trial; check the site for the trial length and pricing.
Step 4: Add the proxy server in Proxifier
- Open Proxifier, choose Profile > Proxy Servers, then click Add.
- Enter the Address (IP) and Port.
- Choose the Protocol that matches your provider. A normal HTTP proxy usually maps to the HTTPS option (forwarded with CONNECT), and SOCKS5 maps to SOCKS Version 5. Exact names depend on your version.
- Enable authentication and enter the username and password.
- Click Check to test it, then click OK.
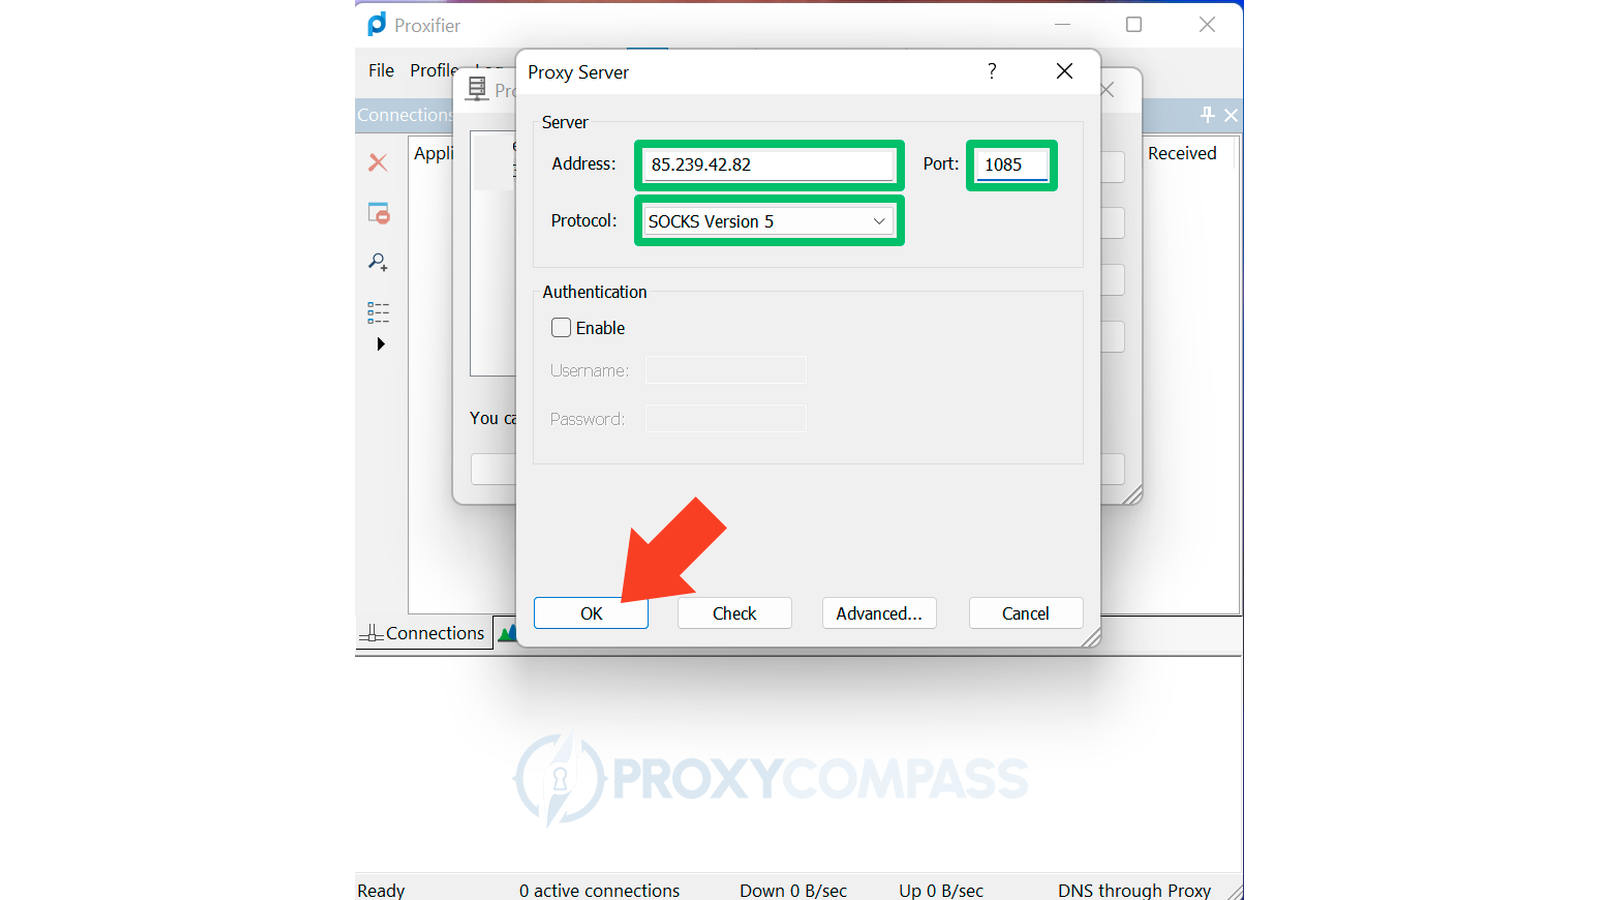
Image: Adding the static proxy in Proxifier (credentials blurred).
The software may ask whether to use this proxy by default for all connections. If you only want certain apps on the proxy, answer No and create a rule in the next step.
Step 5: Set per-app rules
- Choose Profile > Proxification Rules, then click Add.
- Give it a name, browse to the app or apps under Applications, and leave Target hosts as Any.
- Set Action to the proxy you just added and click OK.
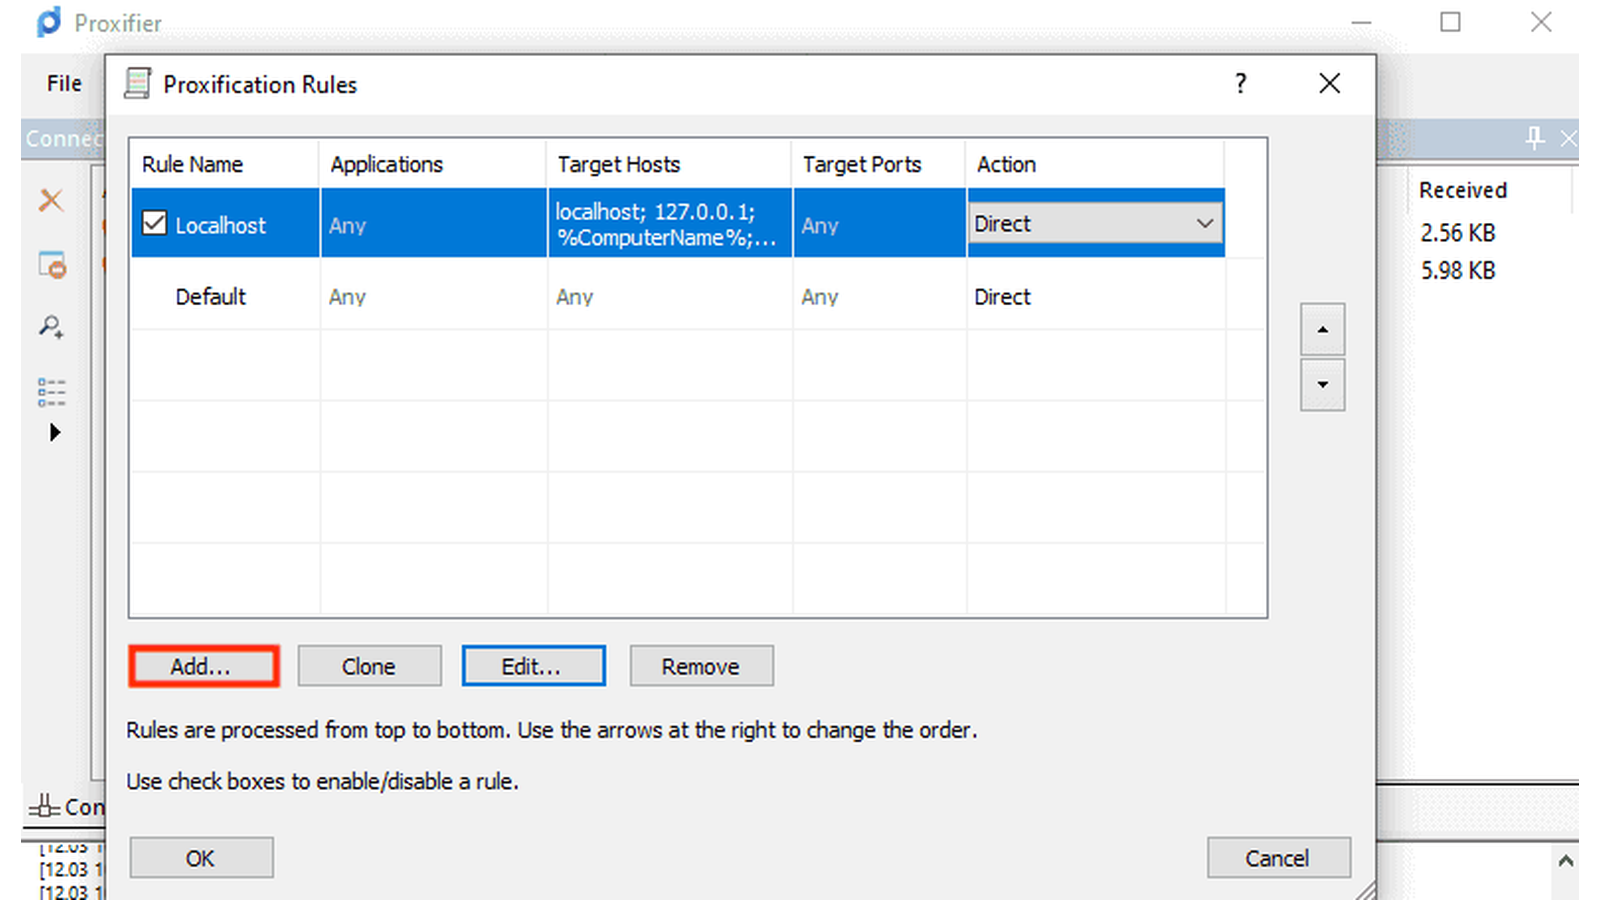
Image: Selected apps use the proxy while everything else stays direct.
Rules are matched from top to bottom, so keep your app rules above the Default rule. To send the whole computer through this proxy, change the Default rule's Action to it, and keep the Localhost rule on direct.
The Windows and macOS versions look similar; menu names may differ slightly by version.
5. The command line and developer tools
Tools such as curl, Git, pip and npm often ignore the system proxy. You can point them at the proxy with environment variables, which only affect the current terminal window.
Step 6: Set the proxy for the command line
macOS / Linux:
export http_proxy="http://username:password@IP:port"
export https_proxy="http://username:password@IP:port"
Windows CMD:
set http_proxy=http://username:password@IP:port
set https_proxy=http://username:password@IP:port
Windows PowerShell:
$env:http_proxy="http://username:password@IP:port"
$env:https_proxy="http://username:password@IP:port"
To set it for one tool only, use that tool's own option, for example Git:
git config --global http.proxy http://username:password@IP:portIf the password contains characters such as @, : or /, URL-encode them before putting them in the address, or it will be parsed wrongly. For a SOCKS5 proxy, start the address with socks5:// instead.
6. Verify, troubleshoot and keep in mind
Step 7: Verify the exit IP
How you check depends on the method:
- Browser or system proxy: open an IP-check site such as
ipinfo.ioand see whether it shows the proxy's IP. A few providers use a different exit IP from the entry IP, so go by your provider's notes. - Command line: run
curl https://ipinfo.io; after you set the variables it should show the proxy's IP. - Proxifier: the connection list in the main window shows whether each connection used the proxy or went direct, so you can confirm the app matched your rule.
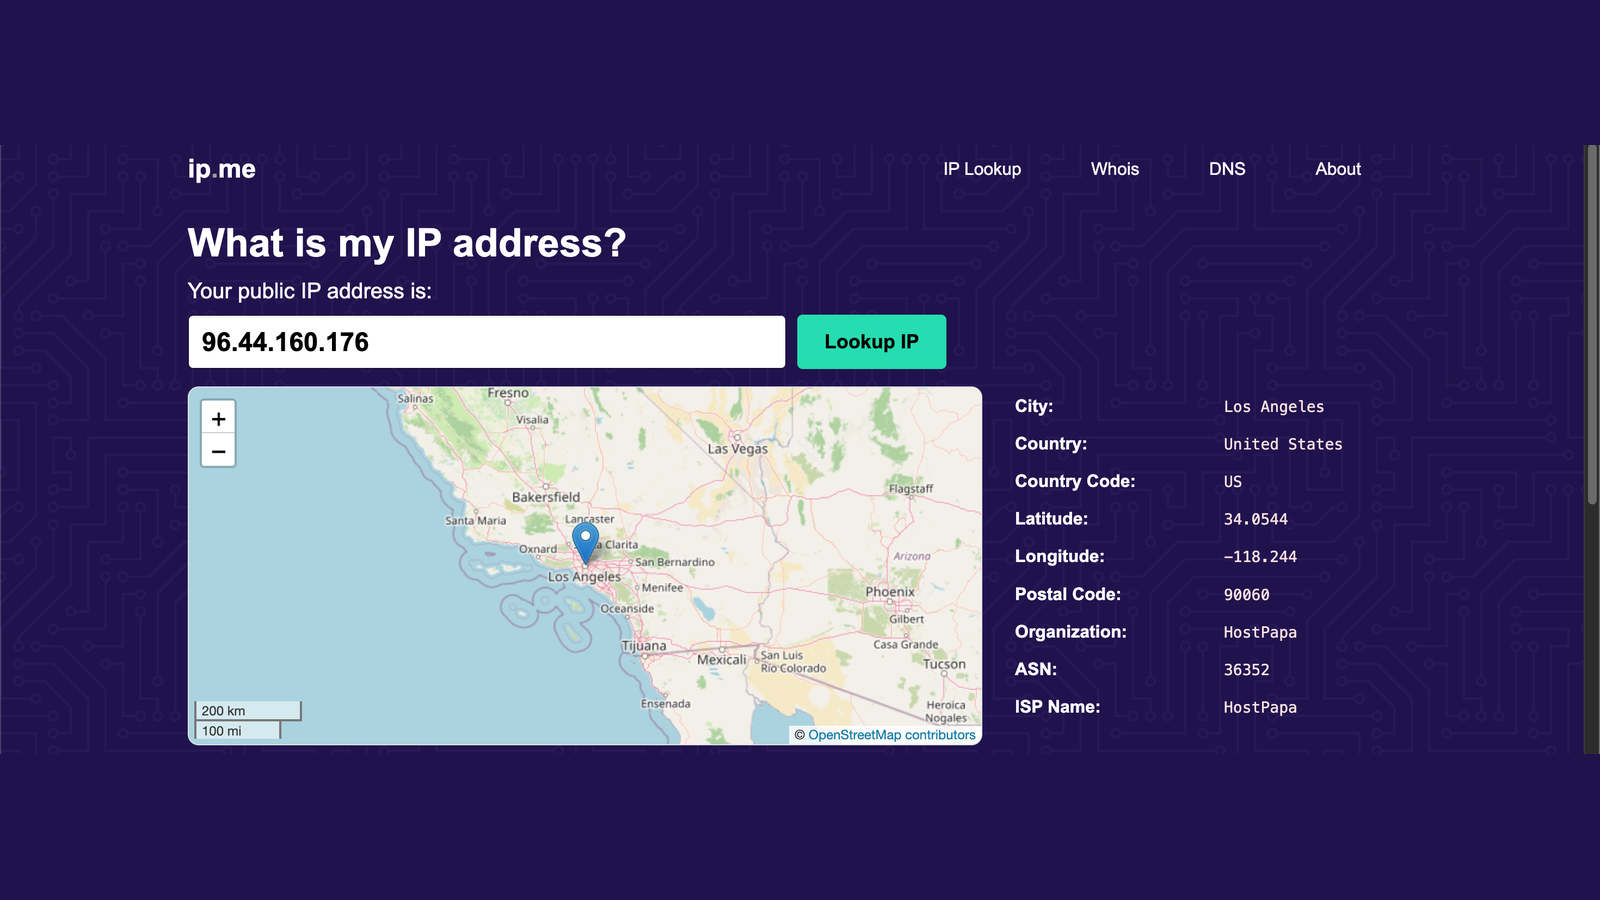
Image: The check page shows the proxy's IP instead of your own.
Step 8: Turn the proxy off when you are done
Switch off whichever methods you used: click Disconnect in the extension, turn off the system proxy switch, disable the Proxifier rule or quit it, and close the terminal window or run unset http_proxy https_proxy. When several methods are on at once, they have different priorities, which is how a proxy can seem to keep running after you turned it off.
Common errors and fixes
| Symptom | Likely cause | What to do |
|---|---|---|
| ERR_TUNNEL_CONNECTION_FAILED | The proxy refused the connection: wrong credentials, your IP not whitelisted, an expired plan, or a wrong IP or port | Re-check each field, then confirm plan status and whitelist in your provider's dashboard |
| Repeated sign-in prompts or authentication failed | Wrong username or password, or a space copied by mistake | Paste again and check special characters |
| One app does not use the proxy | It ignores the system proxy | Create a Proxifier rule for it |
| IP does not change | A direct rule matched, or another proxy tool or extension is in control | Check the Proxifier rule order and turn off other proxy tools |
| Connection fails or pages will not load | Wrong protocol | Try HTTP first; if your provider says SOCKS5, switch to SOCKS5 |
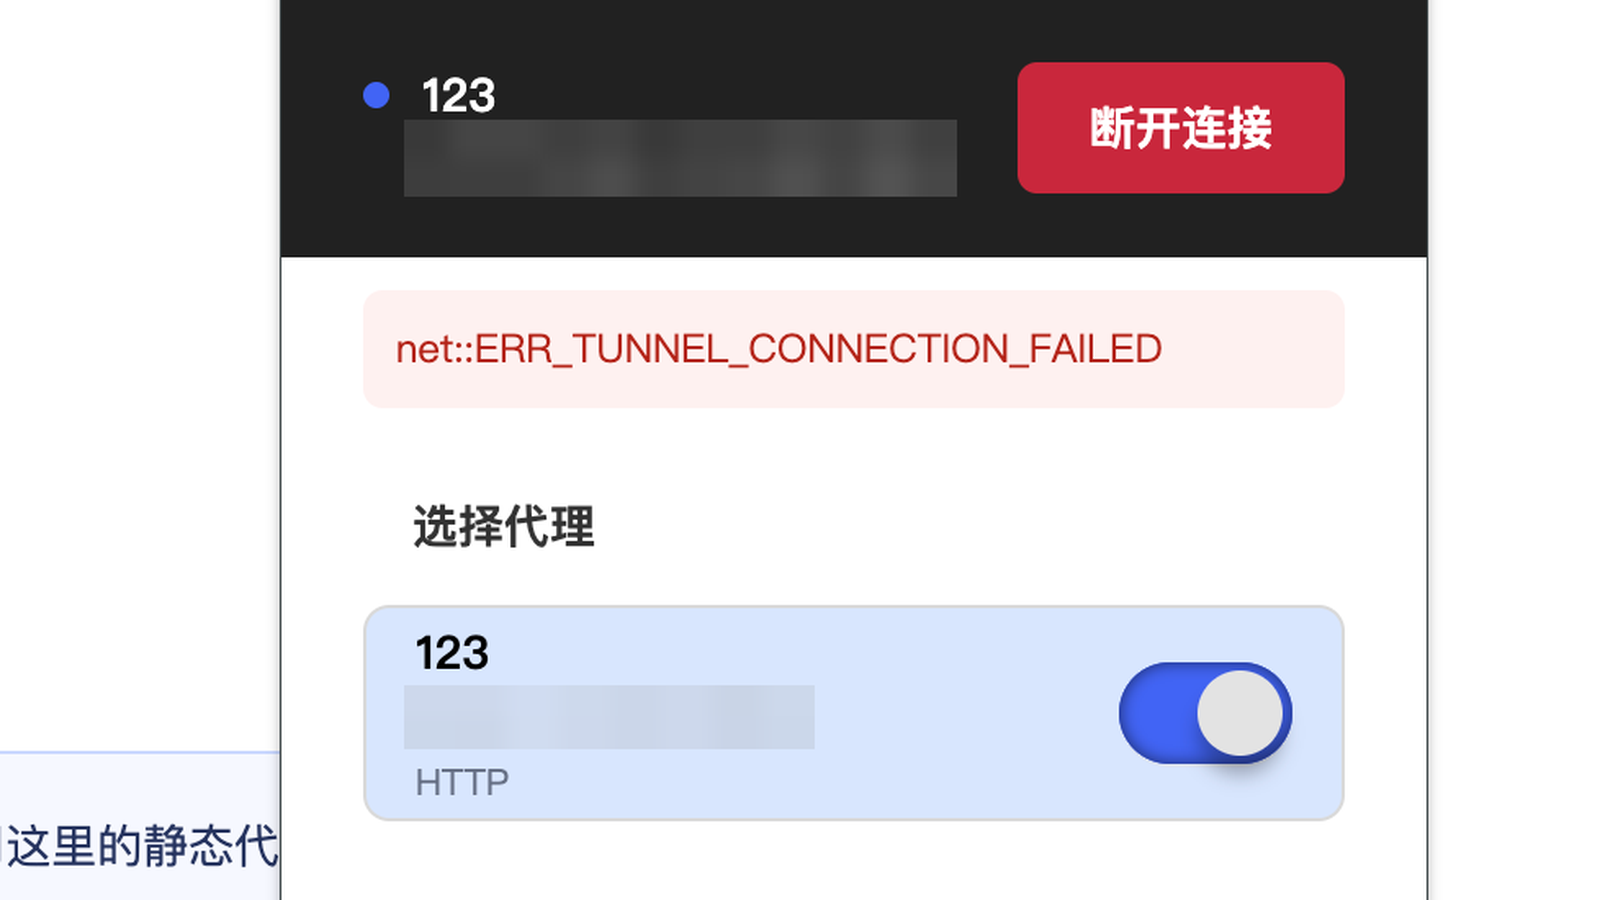
Image: When the connection fails, the error is shown right in the popup.
To tell whether the proxy or your app settings are at fault, test from the command line:
curl -x http://username:password@IP:port https://ipinfo.ioIf the command fails too, the proxy itself is the problem and you should contact your provider. If it works but your app does not, go back and check the app's settings.
If you also run Clash, V2Ray, sing-box or similar, their system proxy or TUN mode can conflict with the methods above. If you need both, make sure your proxy provider's IP whitelist includes your current node's exit IP. Routing the whole computer, including UDP traffic, needs a client with TUN support, which is more complex and not covered here.
Apps and menus change between versions; check the latest notes in each tool, and the Proxifier website for trial length and pricing.
7. Summary
Use IP Proxy Assistant for the browser, the system proxy for the computer's regular traffic, Proxifier for specific apps or apps that ignore system settings, and environment variables for the command line. Whichever you pick, verify it with an IP-check page or curl once it is set up.
Do not skip verification: check each app you want on the proxy and confirm its exit IP is the proxy's IP before you start using it. For more tutorials on network and account setup, see the related articles on 5buyai.com.